Before we move towards the Easy Steps:
Please Note:
1.Turn off your router and computer.
2.Connect your WAN port of the TP-Link router via an Ethernet cable Provided by ISP; connect a computer to TP-Link router’s LAN port via an Ethernet cable.
3.Power on your router and computer/
Now Follow the Steps:
Step 1:
Log into the router’s web-based management page.
Open a web browser (i.e Safari, Google Chrome or Internet Explorer). At the top of the window in the address bar, type in http://tplinkwifi.net or 192.168.0.1 and press Enter
Note:
The default access address differs by model. Please find it on the bottom label of the product.
Step 2:
Type the username and password in the login page. The default username and password For TP-Link devices is admin.
Note:
All letters for both username and password will be lower case.
Step 3:
Configure WAN Connection Type
On the router’s management page, click Network > WAN on the left of the web page:
Change the WAN Connection Type to PPPoE.
Step 4:
Enter your PPPoE username and password which are provided by your ISP.

Step 5 :
Click Save to save your settings, then the router will connect to Internet after a while.
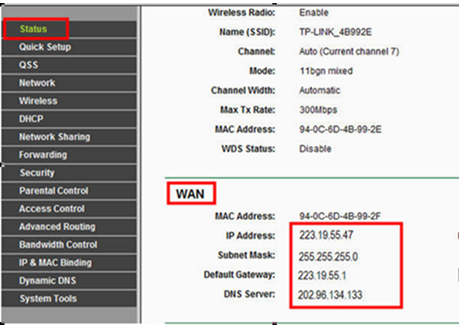
Step 6 :
Wait for a few minutes and check the WAN part on the Status page, if it shows any IP address (similar as below), that means the connection between the Router and the Modem is established.
Step 7:
If there is not wan IP address and no internet access, please do a Power Cycle as the below:
1. Turn your router and computer off, and leave them off for about 2 minutes;
2. Turn on router first, wait till the it gets ready and Power wifi Connectivity Light Starts flickering, then turn computer back on.
Credit - Tp Link
Thank a lot for this post that was very interesting. Keep posting like those amazing posts, this is really awesome :)
ReplyDeleteLooking for TP-Link Support, visit on:
TP-Link Australia Support